There seems to be a belief that accessible bathrooms need to look more institutional. This is simply not true (in fact, it’s a harmful myth). Accessible bathroom design or Accessibility was treated as a later concern, and thousands of beautiful bathrooms remained completely impractical for those who used them every day.
When renovating, there’s absolutely no reason why your bathroom cannot be both proper and relatively useful for the way you live. This is true even though there can seem to be tension between the two — but not if you design it right from the start.
Start with layout, not fittings
One of the top accessible bathroom design errors is treating accessibility as a checklist-style method you throw on at the last moment. Bath lift this, shower seat that — bang, you are good to go. The downside is that the fittings only work to a point if you don’t think out the layout long before.
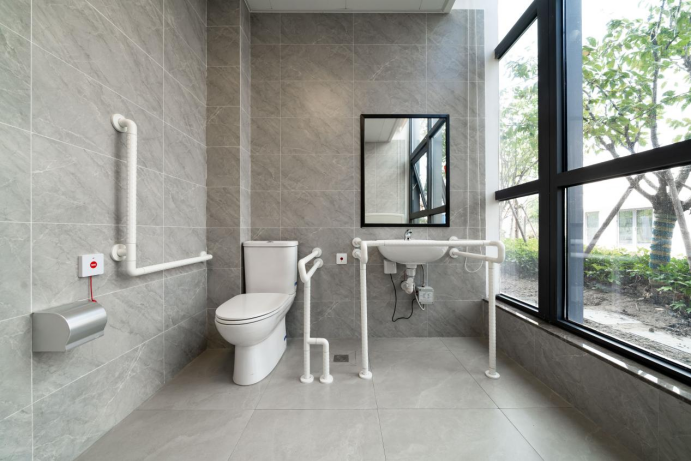
You can consider activity space from the beginning. That changes for wheelchair/walker users. Standards require a minimum clear floor space of 900mm when used in conjunction with fixtures— but based on experience, if you can get to the magic 1200mm, especially at the entryway and bathroom shower area, you will really feel so much better living there day-to-day too.
Go for a threshold-free floor design, bordered with tiles and walk-in showers. They’re modern and chic, they open the room up, and of course they’re actually safer for everyone. With a threshold-free shower, it is all about getting the falls right so water actually stays where it belongs.
Choosing fittings that look intentional
Low wall hung vanities, wide doorways and lever handles dethroning knobs; a well-executed flush of design intention. A brushed-nickel (or matte black) lever-handled door fitting can be every bit as elegant as a round knob—and a hell of a lot easier to operate with wet fingers or diminished grip strength.
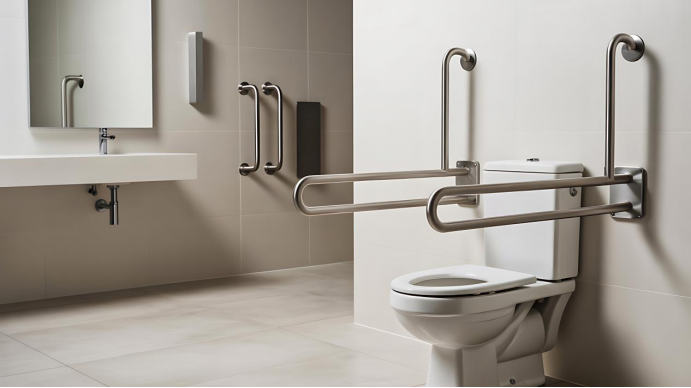
Grab rails are an interesting one and deserve a special mention here because they have improved so much. Rails that blended seamlessly into the rest of a bathroom’s metalwork, designed to mount at every angle, large and small, where it all had continued to be only part of everything. And in a few cases, even served as heated towel rails. Cheap, easy-fit blocking (timber reinforcement) is readily available in the wall during renovation; retrofitting grab rails into an unreinforced wall years later becomes costly and disruptive. Just do it now, when you may still not need rails yet.
You realise flooring is a bigger deal than the average Joe would have you think. Polished surfaces may photograph nicely, but become deadly slippery when wet. While streamlined, large-format tiles with narrow joints are more easily kept clean and create a more cohesive look, smaller or mosaic formats and textured surfaces deliver higher slip resistance beneath the foot. Somewhere in between are the matte-finish or honed tiles in larger formats.
Lighting and storage
Layered lighting helps a bathroom serve its purpose while giving it shape. The simplest answer is that it isn’t (1 complete fixture). When peering into the vanity mirror, task lighting can help to reduce shadows, which makes the space more manageable, especially for someone with low vision. So put in ground-level night lighting close to the bathroom — low-cost, easy.
Put things within reach so that you can grab them without stretching or straining. Which sounds obvious — yet still gets missed by most. Problems that accumulate over the years of daily use, such as cabinet heights demanding a step to reach the top shelf or vanity drawers low enough to require deep bending. Carrying the most frequently used items between hip and shoulder height is practical (not height specific).
Pay Attention to the Details Of The Toilet
When it comes to a bathroom, nothing bears more directly on the usability of daily life than a toilet, and it’s in this realm that accessible design fails more than ever. Excluding height, clearance and toilet type are the key considerations:
Standard toilet pan heights are either 380mm – 400mm to the seat, which could be okay for most adults, but lower than desirable if they have knee or hip issues, or elderly users, who find it difficult rising from a low sitting position. A comfort-height toilet (ideally an ambulant toilet height in the 450–500mm range) distinctly creates a practical advantage.
An ambulant toilet is what it says: an ambulant loo for the ambulantly disabled. Standards for the installation of ambulant toilets specify minimum clearances on either side of the pan (typically 800 mm from the centre line to any wall or obstruction at one side), heights and positioning of grab rails, door width and swing, etc.
Bringing it together
Good access bathroom design. You walk in, you see the bathroom, and it works perfectly. You see a list of accommodations, but they are not immediately apparent. That’s the goal. The decisions that make a space genuinely usable by a wider spectrum of people — reasonable clearances, level-entry showers, sensible toilet height and layout, correct positioning of grab rails; flooring that really works — tend to be the same choices that result in a bathroom being better for all who use it.
If you are in the middle of renos, this is when these decisions should be made — walls exposed and layout still malleable. The price for changing the tiles or vanity becomes huge once they are installed. From an economic and tactical point of view, it is light-years better to design with accessibility up front than having to retrofit later on.
Ready to see how deep the rabbit hole goes? Enter our knowledge hub at 2A Magazine.