Video creators often struggle to accurately match elements to moving subjects in the footage. This process has always been a bit complicated and time-consuming. With motion tracking, it becomes easy to follow an object’s movement across video frames.
In other words, anyone can quickly add effects, text, or graphics that move naturally with subjects. Therefore, this technique is essential for creating smooth and professional-looking videos today. The article explains the benefits and how to use motion tracking easily in Filmora step by step.
Part 1. Motion Tracking Basics: What Is Movement Tracking in Video Editing
For those just beginning to learn video editing, motion tracking means following a moving object across frames so effects can match its movement. This process can be done manually or with an AI tool. The editor or AI tool analyzes pixel changes to create a motion path.
Afterward, text, graphics, blur, or other effects are pinned to that path and move naturally with the subject. Doing this helps add labels, hide faces, stabilize shots, and blend real footage with digital elements. In the end, video motion tracking gives more polished clips.
Video Motion Tracking Benefits: Why Creators Use It
Content creators, specifically videographers, use motion tracking because it makes their videos clearer, more fun, and more professional. It also saves time by letting AI do the hard work.
- Highlight Moving Subjects: Keep the audience’s attention on the main person or object. Editors can attach arrows, circles, or labels that follow them so viewers never get confused.
- Add Text that Follows Motion: With movement tracking, make names, stats, or captions move with a person or product. This makes information easy to follow and feels like it belongs in the scene.
- Blur Faces and Private Details: Creators use motion tracking to blur faces, license plates, or screens that are in motion. The blur stays locked onto the moving object, protecting one’s privacy.
- Make Effects Look More Realistic: Pin explosions, sparkles, or stickers to moving objects to make them feel natural. Since effects follow the motion, the video looks more polished and less fake.
- Save Time with Less Manual Work: Without tracking, editors would adjust positions frame by frame by hand. This would take a long time. AI now does this automatically, speeding up the whole edit.
- Keep Shots Steady and Focused: Some tools use tracking to stabilize shaky footage around a subject. This keeps the viewer’s focus on the important action and makes the video easier to watch.
- Tell Clearer Visual Stories: By sticking text, icons, or arrows to moving things, creators explain ideas faster. Viewers instantly see what matters, which makes tutorials, vlogs, and ads easier to understand.
Part 2. Motion Tracking in Filmora: Desktop AI Tracking Features
Wondershare Filmora is designed for everyday creators and small teams. It runs on Windows, Mac, Android, iOS, and iPad, so projects stay flexible. The interface is clean, drag-and-drop-based, and beginner-friendly, so anyone can jump right in and start using it.
Many users choose this software for creating YouTube videos, social clips, school projects, and promos. With features like AI motion tracking, auto reframe, and smart cut, advanced effects feel simple. This easy-to-use video editor for PC users is a good option when learning motion video tracking.
Key Features
- It turns emojis, stickers, and effects into moving visuals that follow subjects, enhancing storytelling.
- Using Filmora’s mosaic tracking effect, blur faces, plates, or screens automatically as they move.
- Easily add titles, labels, or subtitles that smoothly follow people or objects throughout the video.
- Select the object, then let AI motion tracking accurately follow it and save editing time.
Part 3. Movement Tracking Workflow in Filmora: Step-by-Step
Editors who prefer speed and automation over manual tracking will find Filmora to be an easier option for video editing. Its auto motion tracker for objects makes following movement easy. Let us look through the steps needed to use Filmora’s motion tracking tool:
Step 1. Create A New Filmora Project
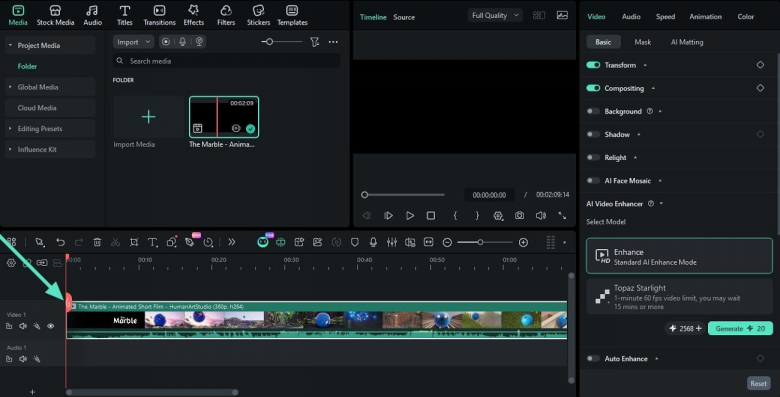
To begin, launch Filmora on the PC and start a new creative project by importing the desired video and dragging it to the editing timeline.
Step 2. Enable the Motion Tracking Effect
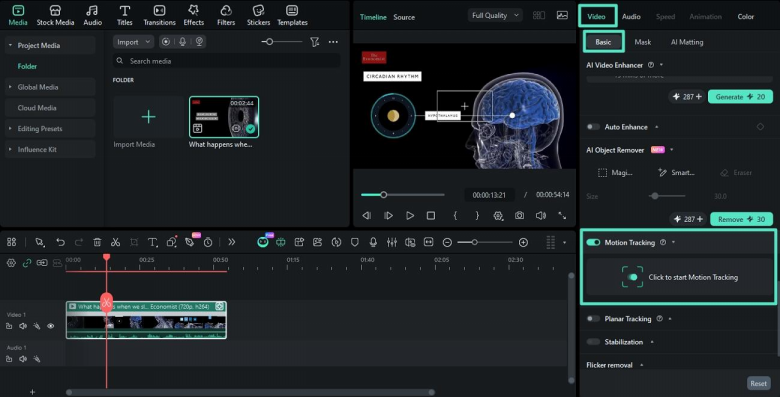
Now, in the upper-right section, there is a “Video” tab, and after clicking on it, go to the “Basic” section. Then, scroll down and enable the “Motion Tracking” option.
Step 3. Adjust the Tracking Box
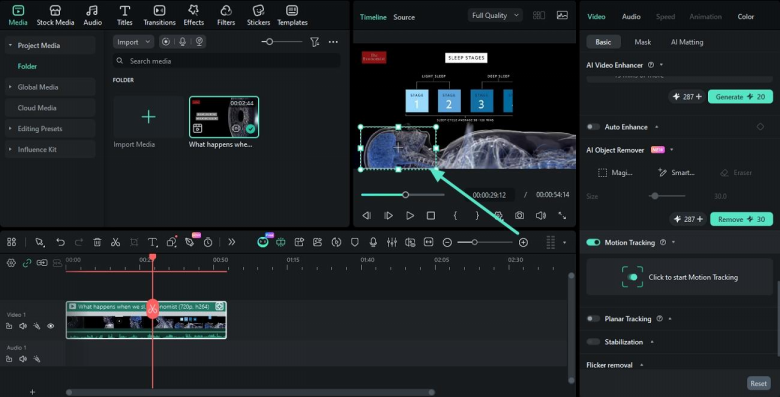
Next, a tiny tracking box appears in the preview window. Resize and drag it over the object that needs to be followed.
Step 4. Start Tracking and Preview the Result
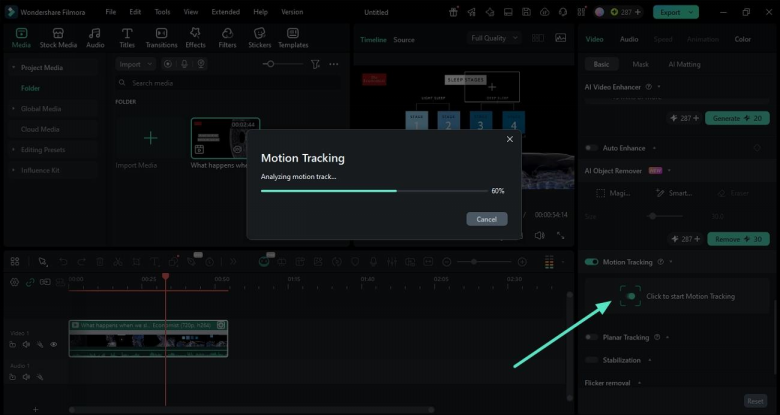
Continuing, click on the “Start Tracking” button so Filmora builds a motion path frame by frame. When it is done, preview the clip to make sure that the box stays locked on the object the whole time.
Step 5. Attach Text or Effect to the Motion
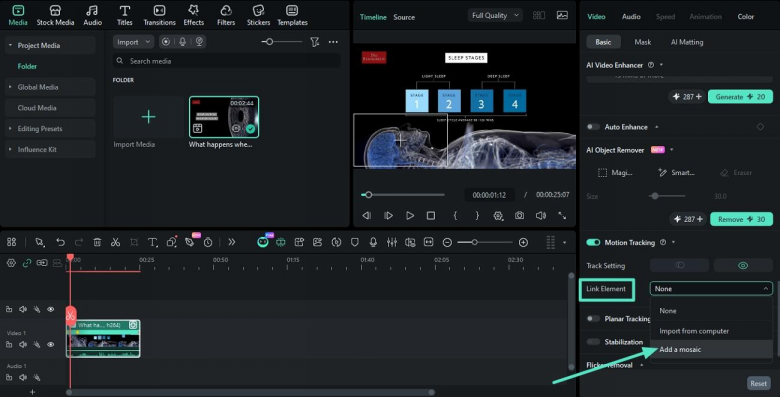
Here, add a title or blur effect to a track above the video on the timeline. In the “Motion Tracking” panel, use the “Link Element” dropdown and choose “Add a Mosaic” option so it follows the tracked path.
Step 6. Export the Tracked Clip
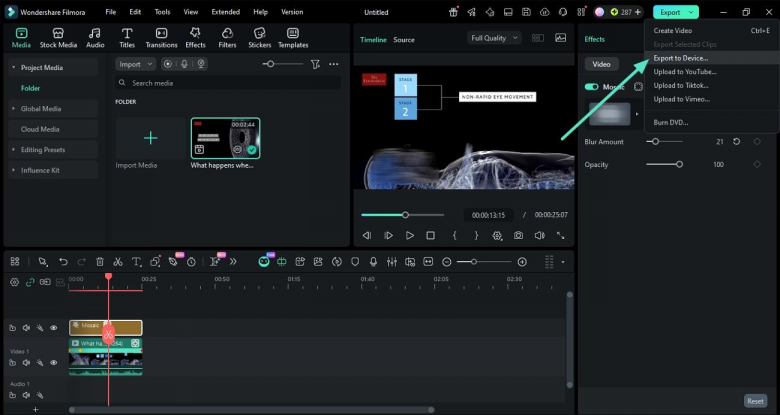
To end, preview the clip and make sure that the attached element’s size and timing look natural on the moving subject. Save the video by clicking on the “Export to Device” option.
Conclusion
In summary, motion tracking provides a straightforward method to add dynamic elements to footage. Editors can track objects, link effects or mosaics, and keep visual focus on key actions. A good option for AI-assisted motion tracking is Filmora. It handles most tracking steps, so users can focus on timing and story. For many editors, Filmora offers one practical way to apply movement tracking in everyday projects.
Note to the Reader: The article is an independent editorial review. It is based on public product data and comparisons. This section does not represent the official views of any publication, software company, or media organization.